
Lusk’s Koura IV

Design Features of the Next Prototype
This series of articles is available as an ebook on Amazon.
Having watched plenty of videos and thought long and hard about the type of fly I wanted to create I started considering the important features of the fly.
The first and most important feature is a fly that looks realistic when fleeing. The legs and claws need to trail behind the fly, and the fly needs to immediately sink back to the bottom.
This mean giving the fly enough weight to get to the bottom after a quick strip as the koura flees an approaching trout.
I also wanted claws with plenty of movement, and that would nicely trail behind the fly when retrieved.
Next was working out how to give the Koura fly the bulk that a Koura has. The Fish Skull Crawbody are very, very thin, perhaps only 1mm thick. This means they are not realistic representations of what a Koura looks like. They do not carry enough bulk, and while they will be adequate as the back of a Koura their very thin pincers are not particularly representative of the Koura.
Size
The Koura I see are usually about 50mm long. They may get to 70mm long but this is relatively rare. At 50mm they have relatively solid bodies so they require some bulk.
Weight
The weight in the fly needs to take the fly down quickly tail first. A 10 gram tungsten bead was my first option, and it looked pretty right on the prototype.
Colour
I am colour blind. This is something of a blessing and a curse when tying flies. It is a blessing because I do not worry too much about colour of the flies, but is a curse because I cannot actually tell the difference between dark green and brown. This caused some problems when I asked around and got a series of answers as to what colour Koura are, with it ranging from dark green through to black. Some said brown, though most of what I could find online was dark mottled green.
This was a little annoying as my prototyping was all brown. I checked with a few mates and discovered that they tied brown koura patterns, and also black and the fish did not seem to mind.
Materials
I have a fair bit of tying material accumulated over the years. There was plenty of dark brown body material I got when I was experimenting with an earthworm pattern, as well as a lot of green for green leech.
Often crawfish flies are tied with rabbit fur, usually zonker strips. I got some of these and immediately eliminated them because they have a white underbelly, which looks nothing like a real Koura. I had a look at a stationery store for a brown marker pen, but they didn’t have any, so I gave up on the idea of using a zonker strip for claws.
Koura are quite bulky, so I wanted to have a fairly bulky body. During my experimenting with earthworms I bought some brown Ultra Chenille and brown Large Trilobal Antron Chenille.
The Antron Chenille is much bulkier than the Ultra Chenille, which made it my preferred tying material.
Claws I wanted big and bulky and with lots of movement. I talked to my mother, a patchwork quilter of note, who reckoned she could not easily find suede or velvet thick enough for what I wanted. This only caused slight concern, as the Fish Skull Crawbody did not really have the right motion for a fleeing Koura.
Thick brown Marabou looked like the best bet for the claws. It would slim down in the water and move a lot when the fly was in motion.
Prototype Two Pattern
Hook: Kamasan B200 #6
Body: Dark Brown Large Trilobal Antron Chenille
Weight: Black 10g Tungsten Bead
Claws: Three Dark Brown Marabou tips tied on both sides of the body.
Tail: Brown Ultra Chenille
Tying Instructions
This fly is designed to swim hook point up so it does not snag on the bottom.
- Smash the barb and put the tungsten bead on the hook before inserting in the vice.
- Tie in a small piece of Antron Chenille as a tail under the hook just behind the bead. This is one side of the tail.
- Tie in a large piece of Antron Chenille tie it on the other side of the tailpiece, leaving about 7mm of tail in front of the bead.
- Wrap chenille down the shank in a single wrap and tie off, leaving a little left over.
- Tie in three pieces of thick marabou either side of the body behind where you have tied off the Antron chenille.
- Wrap the left over chenille over the marabou and bring it back about half way down the body and tie off.
- Apply a flexible glue like Dave’s Fleximent to the tie off points. Do not use hard setting glue like Zap a Gap as it will affect the fly’s motion.
- Burn each of the tailpieces to stop them unravelling.
Understanding the Pattern
I have gone with a very simple pattern that will always swim right, and looks approximately like a Koura rather than being an exact replica. While I do not think it is crucial I wanted the tail underneath the fly and ready to flick under the body when pulled through the water.
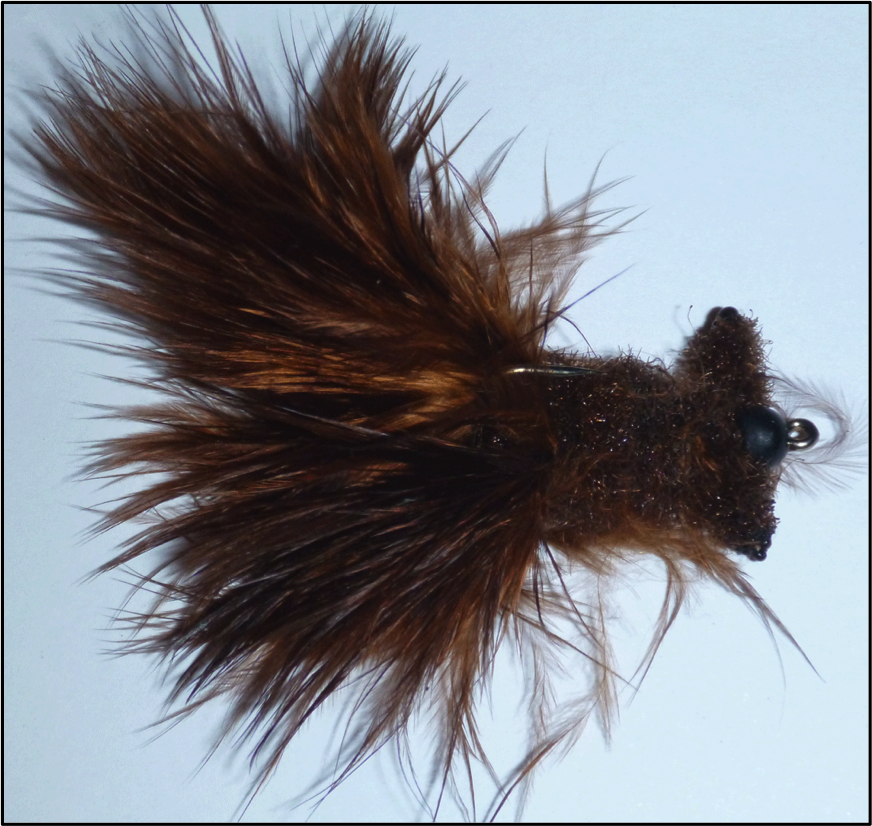
Koura Pattern #2, a confirmed failure.
Testing on Trout
I am lucky enough to live in a place that has warm, sunny, still winter’s days. This means my local lake is an absolute pleasure to fish, with cruising rainbows and browns around the lake edge visible from a long way away.
The first perfect day I took my prototype flies out to be tested. The basic design was sound, but the very heavy tungsten bead made the fly too heavy to cast easily with my fast action five weight rod, and it made far too much of a splash to be able to be presented properly.
The twin clumps of marabou and the weight in the tail gave the fly a beautiful fleeing crayfish action, and certainly attracted a lot of attention from the fish. The Trilobal Antron seemed to absorb a lot of water, which was unexpected, and added to the weight of the fly. This made a heavy and tricky to present fly even heavier and trickier to present.
So the second prototype flies were set aside for recycling or fishing on a sinking line after dark in places where there are aggressive big browns available.
I. Lusk’s Koura | II. Further Design Work | III. Trout & Flies for Similar Conditions | IV. Design Features for the Next Prototype | V. Rethinking the Koura Pattern | VI. Prototype 3, 4 & 5 | VII. A Fish Catching Fly | VIII. Further Design Work II | IX. Lusk’s Koura Tying Instructions | X. Fishing Lusk’s Koura | XI. The Best Pattern | XII. A Revised Pattern | XIII. A Jig Hook Koura
This series of articles is available as an ebook on Amazon.